If you are searching for a saturation plugin in 2026, the hard part is not finding options. It is finding one that actually speeds up a mix instead of becoming another menu-diving distraction.
Affiliate note: some links in this article are affiliate links. If you buy through them, I may earn a commission at no extra cost to you. I am currently evaluating Grit Blender, so this is a first look, not a final scored review.
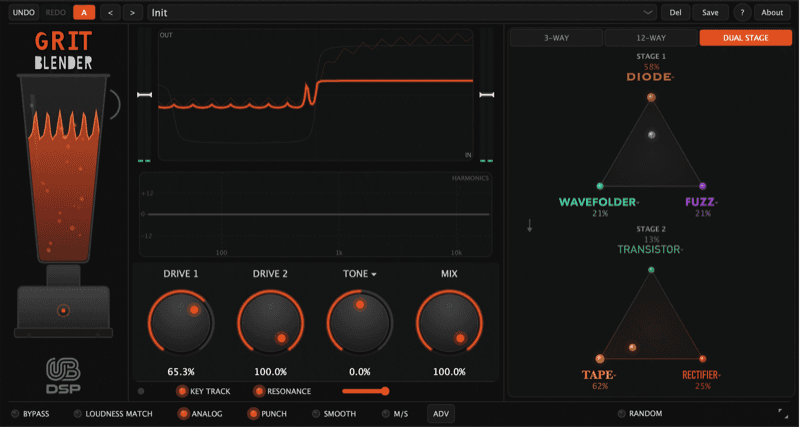
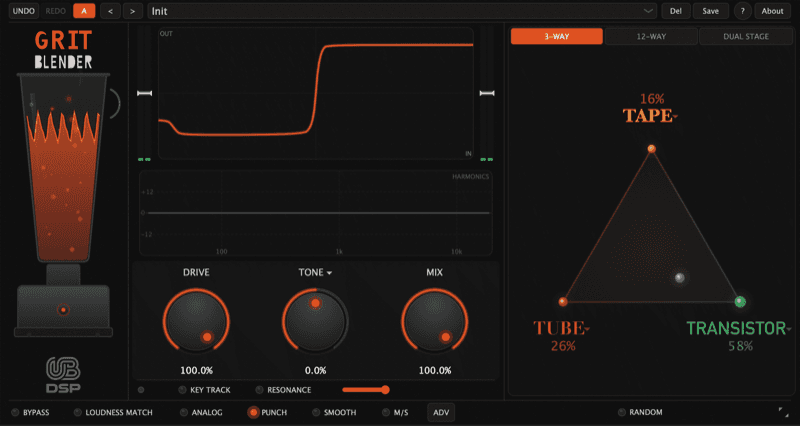
That is why UB DSP Grit Blender caught my attention. It is not trying to be only a tape plugin, only a tube plugin, or only a wild distortion box. It is an audio effect plugin built around 12 saturation algorithms and a blending workflow that lets you move between colors instead of swapping plugins every time the sound feels close but not quite right.
The more I look at it, the more I see myself using it as a layer rather than a dramatic one-plugin makeover: a little warmth behind a vocal, a grit layer under drums, upper harmonics on bass, or a subtle blanket of color over synths and samples. That is the kind of saturation tool I actually keep reaching for.
If you want to test it yourself, start here: try Grit Blender from UB DSP.
Is This Saturation Plugin Worth Testing?
I would not call anything the best saturation plugin after only a first look. That would be lazy, especially in a category where Soundtoys Decapitator, FabFilter Saturn, Baby Audio TAIP, Klanghelm IVGI and dozens of other tools already have strong reputations.
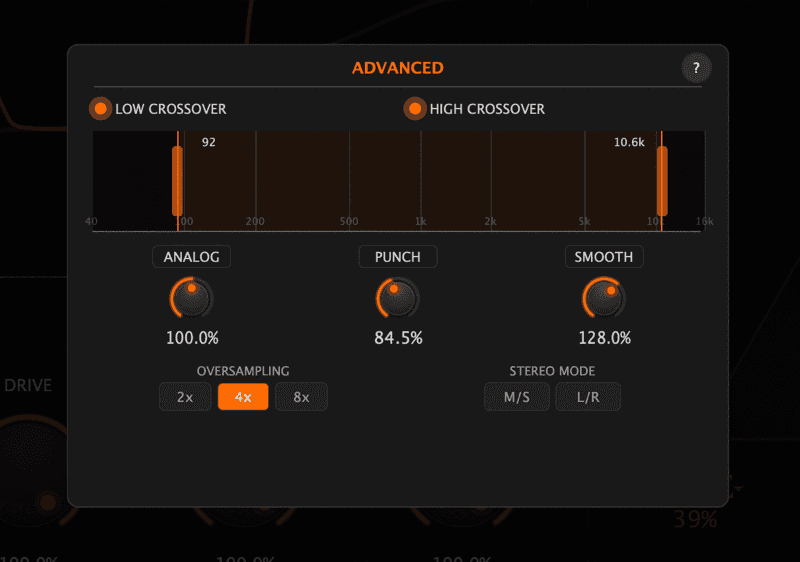
The better question is whether Grit Blender has a specific reason to exist in a crowded folder. From the feature set, it does: it combines multiple saturation characters with a fast blend interface, M/S options, Dual Stage processing and an optional MIDI key-track crossover.
That combination makes it more interesting than a simple one-knob warmer, but less intimidating than a full modular distortion suite.
What Grit Blender Actually Is
Grit Blender is a saturation plugin, distortion tool and harmonic color processor. You can use it like a normal insert effect on vocals, drums, bass, synths, guitars, samples or buses.
It is not only a MIDI effect. The MIDI part is an optional key-track crossover feature, which can make the crossover follow incoming MIDI notes. That is useful for bass and 808-style material because the low fundamental can stay cleaner while the saturation works above it.
The bigger idea is simple: one plugin, multiple saturation characters, and fast movement between them.
The headline features are strong:
For the general UB DSP site, use this link: UB DSP website.
Why This Saturation Plugin Could Fit Vocals, Drums and Bass
A useful saturation plugin needs to work on more than one perfect demo sound. I care about whether it can solve normal mix problems quickly.
On vocals, I would test Grit Blender for low-level parallel saturation, extra edge on a lead, or a little density before compression. The risk with vocal saturation is harshness, so the Smooth control is one of the first things I would check.
On drums, I would test it on close mics, drum bus, room mics and loops. This is where saturation can add punch and perceived loudness without only reaching for a limiter.
On bass, the key-track crossover is the feature I would pay most attention to. If it keeps the low end stable while adding upper harmonic bite, that is genuinely useful.
On synths and samples, the triangle blending workflow could be the creative part. Instead of committing to one distortion type, you can move between characters and automate the blend.
If you are still learning how saturation changes tone and loudness, I wrote a separate explainer on how audio saturation works→.
The Smart Feature: MIDI Key-Track Crossover
The viral feature here is the one that sounds small on paper: MIDI key-track crossover.
Most multiband saturation tools use fixed frequency bands. That can work, but bass notes move. A crossover that feels good on one note might hit the next note differently.
With key tracking, the crossover can follow MIDI pitch. In practice, that means Grit Blender could be interesting for bass lines, 808s and synth bass where you want grit without wrecking the bottom octave.
That does not make it a MIDI-only plugin. It is still an audio effect. MIDI is just one optional control path.
How I Would Actually Use It
The most realistic use case for me is not smashing every track with distortion. It is using Grit Blender as a controlled layer of warmth and movement.
On a vocal, I can imagine using it in parallel to add a little forwardness and texture without making the vocal sound obviously distorted. On a drum bus, I would use it as a grit layer that helps the groove feel more finished. On bass, I would use it to bring out harmonics so the part speaks on smaller speakers while the low end stays stable.
That is a positive sign. The plugins that stay in my sessions are usually not the ones that sound the biggest in solo. They are the ones that add a small layer of tone that makes the whole track feel more alive.
Grit Blender vs Classic Saturation Plugins
The obvious comparison is not that Grit Blender replaces every classic saturation plugin. It probably does not.
Decapitator is still the obvious name when people ask for an all-purpose saturation and distortion plugin. Saturn is still the obvious name when people want deep multiband control. Tape-focused plugins still make sense when the goal is specifically tape compression, wow, flutter or vintage glue.
Grit Blender’s angle is different. It looks like a fast color-shaping tool for producers who want to blend saturation types and move quickly between subtle grit, obvious harmonic push and more creative distortion.
That makes it a better fit for “I need a tone that works now” than “I want a perfect model of one piece of analog hardware.”
For tape-style context, my older article on Logic Pro tape emulation plugins→ is a good related read. Grit Blender is not only tape, but it belongs in the same conversation about color, drive and harmonic movement.
What Other Producers Are Saying So Far
The early public discussion looks promising, but still young. KVR has an active Grit Blender thread, and the tone there is mostly positive around the interface, the key-track idea and the way it sits between subtle saturation and heavier distortion.
That said, I would not call this a settled classic yet. It does not have years of broad user consensus behind it. That is exactly why the right move is to test the free trial on real sessions before treating it like a must-buy.
The available public data is still limited, so I am treating this as a practical evaluation instead of a hype post. Source: UB DSP’s own press information lists the 12 algorithms, formats, free trial and platform support, while the KVR discussion gives a better read on early user reaction.
Who Should Try This Saturation Plugin
Grit Blender is worth testing if you want a saturation plugin for vocals, drums, bass, synths and buses, and you like the idea of shaping tone visually instead of choosing one static mode.
It also makes sense if you produce bass-heavy music and want to experiment with harmonic grit while keeping the lowest notes cleaner.
You may not need it if you already have a saturation chain you love, or if you only want one simple tape color with almost no controls.
Where I Would Start Testing
My first test chain would be simple:
The key is not to ask whether a plugin sounds impressive in solo. The useful question is whether it makes a part sit better in the track.
Vocal Test
For vocals, I would start with a low mix amount and listen for presence, consonant harshness and level stability. A saturation plugin can make a vocal feel more forward, but it can also exaggerate sibilance if pushed too hard.
The safest test is parallel: duplicate the vocal bus or use the mix control, add grit until it is too obvious, then back it down until the vocal only feels more alive when the effect is muted.
Drum Test
For drums, I would test both individual channels and the drum bus. Close mics can take more attitude, while a full drum bus needs more restraint.
This is where Punch and Smooth matter. Punch should help the transient feel alive, while Smooth should stop cymbals and upper mids from getting brittle.
Bass Test
Bass is where this saturation plugin could be most interesting. If key-track crossover keeps the fundamental clean while adding upper harmonics, it can help bass translate on small speakers without losing weight.
That is also where I would be strict. If the low end shifts too much or the note definition gets worse, the feature is clever but not useful. If the low end stays centered and the mids come forward, it earns a place in the chain.
UB DSP Just Released Vowel Blender Too
While I was still putting Grit Blender through its paces, UB DSP shipped a second plugin, and it scratches a completely different itch: Vowel Blender.
Where Grit Blender is about saturation and color, Vowel Blender is about movement. It is a formant filter built around a 2D phonetic pad: you drag across 10 vowel sounds from the International Phonetic Alphabet and whatever you feed it starts to "speak." That runs from a subtle vowel breath on a pad at one end to full talkbox transformations at the other.

A few things stand out to me on paper:
It is the same UB DSP design philosophy as Grit Blender: simple to drive, rewarding to explore. I am treating it exactly like I am treating Grit Blender here, as a first look rather than a final verdict. The first places I want to test it are bass, synth pads and drums, where formant motion adds character that a normal EQ simply cannot reach.
One practical note on timing: it is $39 during the intro period (until July 1, 2026, then $68), and there is a free unlimited trial plus a 30-day money-back guarantee, so it costs nothing to audition on your own material first: try UB DSP Vowel Blender.
Quick Links
If you are comparing broader plugin categories, my best VST plugins for music production→ roundup is the better starting point.
Early Take
Grit Blender looks like one of the more interesting newer saturation plugins to test in 2026 because it is not just another analog-style warmer. The triangle blend, Dual Stage mode, M/S options and key-track crossover give it a more flexible angle.
I would not call it the best saturation plugin yet without more hands-on testing across full sessions. But I can already see the kind of role I would want it to play: not a heavy-handed effect on everything, but a useful tone layer for warmth, grit, presence and movement.
If you produce, mix or sound design and want a saturation plugin that can move from vocals to drums to bass without feeling like a single-purpose box, Grit Blender is worth auditioning.
Start with the trial, use it on your own material, and only buy it if it earns a place in your chain: try UB DSP Grit Blender.